How to TIG Weld: A Beginner's Step-by-Step Guide
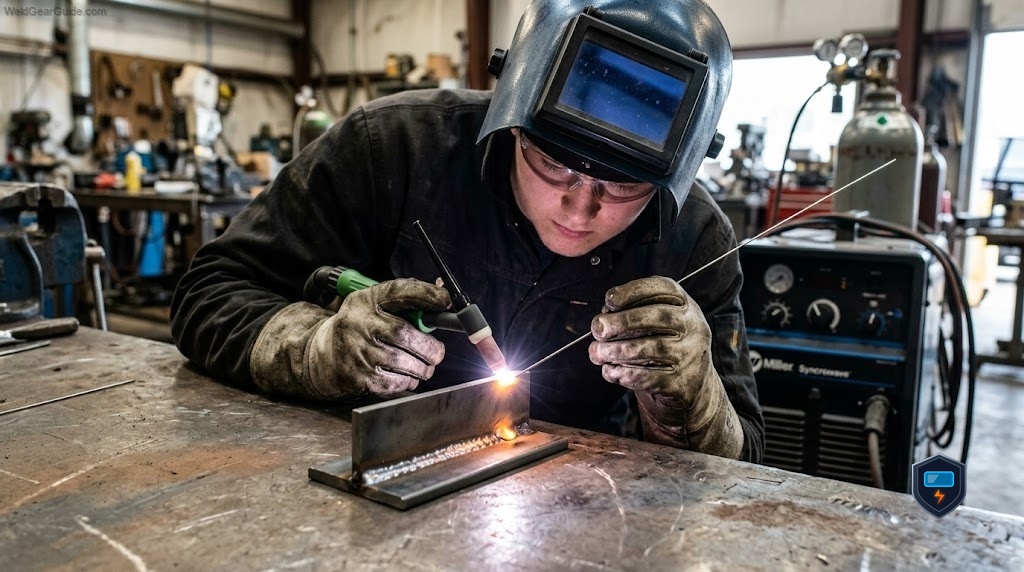
The first time you TIG weld, your brain runs out of hands. Torch in one, filler in the other, foot on the pedal, eyes on a puddle the size of a pea, and somehow all of it has to happen at once. Everyone feels that. The people who get good are simply the ones who broke it into steps and practiced each one until it stopped needing thought.
So let me give you those steps, in order, the way it actually works at the bench.
Before you strike an arc: setup
Good TIG welds are mostly decided before the arc ever starts.
1. Clean the metal. TIG is unforgiving of contamination. Degrease the joint and, for aluminum, brush it with a stainless brush kept only for aluminum. Clean metal is not optional.
2. Prepare the tungsten. Use a 2% lanthanated electrode (blue) as your all-purpose start. For steel and stainless on DC, grind it to a point with the grind marks running lengthwise, not around the tip, because grind direction affects arc stability. For aluminum on AC with a modern inverter, a slightly truncated point works. A quality 2% lanthanated tungsten 10-pack gives you spares, because you will contaminate a few while learning.
3. Set polarity. DC electrode negative for steel and stainless. AC for aluminum and magnesium. This is the single most common setup mistake beginners make.
4. Set gas. 100 percent argon, roughly 15 to 20 cubic feet per hour for most work. Check for leaks and make sure the cup is clean.
5. Set amperage. A rough rule is about 1 amp per 0.001 inch of steel thickness, so 1/8-inch steel wants around 125 amps as a ceiling, controlled down with the pedal. Aluminum needs more heat for the same thickness.
The technique, step by step
6. Get into position. Hold the torch at roughly a 15 to 20 degree lean from vertical, tungsten sticking out a short, consistent distance past the cup (about the diameter of the tungsten as a starting point). Rest your hands so they are steady; TIG is a game of tiny, controlled movements.
7. Start the arc. With HF start, hold the tungsten a short distance above the metal and press the pedal; the arc jumps the gap without touching. With lift start, touch the tungsten to the work and lift off gently. Never grind the tungsten into the puddle, which contaminates it instantly.
8. Form the puddle. Hold the arc in place until a small, shiny molten pool forms. This is the foundation of the bead. If nothing melts, add amperage; if it grows too fast, ease off the pedal.
9. Add filler. Dip the filler rod into the leading edge of the puddle, not into the arc itself, in small even touches. Pull it back slightly between dips but keep it inside the gas shield so the hot end does not oxidize. The rhythm is: puddle, dip, move, puddle, dip, move.
10. Travel. Move the torch slowly and steadily along the joint, keeping the arc short and the puddle consistent, adding filler as you go. Slow and even beats fast and jerky every time.
11. Fill the crater. At the end, taper the pedal down while adding a last touch of filler so you do not leave a shrunken divot that can crack.
The most common beginner mistakes
Touching the tungsten to the puddle. It contaminates the tip instantly, the arc goes ugly, and you must stop and regrind. Everyone does this early; the fix is a steadier hand and a slightly longer arc.
Dipping filler into the arc instead of the puddle. This spatters and contaminates. Feed into the front edge of the pool.
Arc too long. A long arc wanders and spreads heat. Keep it short and consistent.
Rushing. TIG punishes speed. Slow down until the bead is consistent, then speed up gradually.
Dirty metal or wrong polarity. Both produce bad welds no technique can fix. Check them first when things go wrong.
Practice plan
- Run beads with no filler on scrap steel to learn puddle control and travel.
- Add filler on flat steel until the rhythm feels natural.
- Move to joints (butt, lap, corner) on steel.
- Switch to AC and practice aluminum, which is less forgiving.
- Only then chase pretty beads; competence comes before cosmetics.
Wear proper protection throughout: an auto-darkening helmet and thin, supple gloves so you can feel the filler rod. TIG gloves should be much thinner than MIG gloves.
The verdict
Learning to TIG weld is really learning to do three things at once, and the way through is to break it into steps and practice each until it becomes automatic. Setup carries most of the outcome, and technique fills in the rest with time on the torch.
Three things to hold onto. Do the setup honestly every time, clean metal, correct tungsten and grind, right polarity, proper argon flow and appropriate amperage, because no technique rescues a bad setup. Build the core rhythm of puddle, dip filler into the leading edge, travel, and keep the arc short and steady. And expect to contaminate tungstens and lay ugly beads while the coordination develops, because that frustration is the normal price everyone pays on the way to clean welds.
Stay patient, slow down, and practice the steps in order. The hands catch up. They always do.
Frequently asked questions
How do you start a TIG weld? With HF start, hold the tungsten just above the metal and press the pedal so the arc jumps the gap without contact. With lift start, touch the tungsten to the work and lift off gently. Then hold the arc until a puddle forms.
What angle do you hold a TIG torch? Roughly 15 to 20 degrees from vertical, leaning in the direction of travel, with a short, consistent tungsten stickout past the cup. Keep the arc short for focused heat.
How do you add filler rod in TIG welding? Dip the rod into the leading edge of the molten puddle, not into the arc, in small even touches. Keep the hot end within the gas shield between dips so it does not oxidize.
Why does my tungsten keep contaminating? Usually from touching it to the puddle or dipping filler into the arc. Keep a slightly longer, steadier arc and feed filler into the puddle’s edge. When contaminated, stop and regrind before continuing.
What amperage do I use for TIG welding? A rough starting rule is about 1 amp per 0.001 inch of steel thickness, controlled down with the foot pedal. Aluminum needs more heat for the same thickness. Adjust to the puddle you see.
What polarity is used for TIG welding? DC electrode negative for steel and stainless steel; AC for aluminum and magnesium. Setting the wrong polarity is one of the most common beginner mistakes.
Do I need a foot pedal to TIG weld? It is strongly recommended. A pedal lets you ramp amperage up to start the puddle and taper it down to fill the crater, which is essential for controlling heat on thin metal.
How long does it take to learn TIG welding? Most people lay basic beads within a few sessions but take weeks of practice to weld joints cleanly, and longer for aluminum. Consistent practice on scrap is the fastest path.
References
- Miller Electric, How a TIG Welder Works and When to TIG Weld
- Miller Electric, All About Tungsten in TIG Welding: Types, Selection and Use
- Lincoln Electric, Square Wave TIG 200 operator’s manual