Welding Table Clamps and Fixture Pins Guide
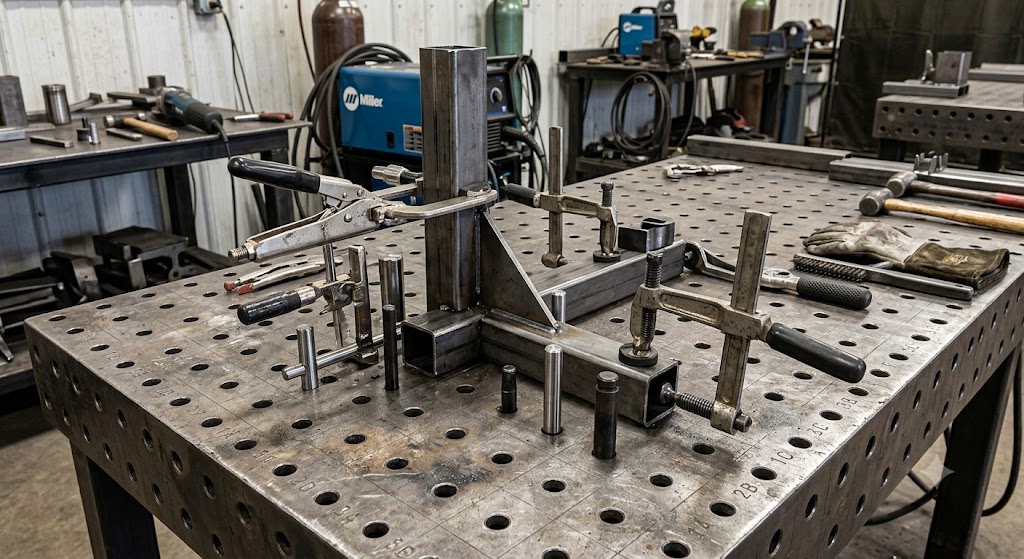
A fixture table with a grid of holes is only as good as the tooling that drops into it. The holes themselves do nothing; it is the clamps and fixture pins you slot into them that turn a flat top into a system for holding work square, flush, and repeatable. If you have bought or built a 5/8 inch or 16 mm hole table and are staring at the empty grid wondering what to buy first, this guide is for you. It covers the core tooling, how the hole sizes work together, and which pieces to start with.
Welding table clamps and fixture pins drop into the holes of a fixture table to hold and locate workpieces. Clamps apply pressure vertically or horizontally, while pins and stops set precise positions. Here is how the system works and what to buy first.
Why table tooling matters
The hole grid plus tooling is what makes a fixture table powerful:
- Repeatable setups, since pins and stops locate parts in the same spot every time.
- Clamping from any hole, so you apply pressure exactly where the work needs it.
- Square, located work, using pins and the grid to set true positions without measuring each time.
- Fast changeovers, dropping tooling in and out rather than reaching for loose clamps.
A bare table holds nothing on its own; the tooling is what does the real work.
Direct answer: the core tooling
A useful starter kit for a fixture table includes:
- Table clamps that drop into the holes and clamp work down vertically or against a stop horizontally.
- Fixture pins (locating pins) that slot into holes to locate and register parts precisely.
- Stops and rests that give parts a reference edge to sit against.
- V-blocks or cones for holding round stock and tube.
Start with a handful of clamps and a set of pins, then add stops and specialty pieces as your work demands.
Fixture pins: the quiet workhorse
Fixture pins are the simplest and most useful tooling you can buy. They are hardened pins that drop into the table’s holes to locate and hold parts in exact positions, letting you set a workpiece against them and know it is registered to the grid. Because the holes are laid out on a precise grid, pins let you position parts squarely and repeatably without measuring every time; set them once, and every part you build against them comes out the same. They are also simple and endlessly useful for building jigs on the fly. A basic set of pins in a couple of lengths covers most locating tasks and is the first thing many people add after the table itself.
Table clamps: pressure where you need it
Where pins locate, clamps hold. Table clamps drop into the same holes and apply real clamping force, either pressing work down onto the tabletop or pushing it sideways against a pin or stop. The inserta-style clamp is the common type: it slots into a 5/8 inch or 16 mm hole and clamps vertically or horizontally at any point on the grid, so you can put pressure exactly where the joint needs it rather than being limited to the table edge like a C-clamp. F-style clamp kits made for fixture tables, such as the Lincoln clamp kit for its own table, do the same job with a familiar F-clamp action sized to the hole grid. A few clamps plus your pins let you locate a part and lock it down anywhere on the table.
Do the hole sizes interchange?
A question that trips up new table owners: are 5/8 inch and 16 mm tooling interchangeable? Practically, they are very close, since 5/8 inch is about 15.9 mm and 16 mm is about 0.630 inch, a difference of only a few thousandths. Most 5/8 inch tooling fits 16 mm tables and vice versa, which is why many brands advertise compatibility across both. The bigger thing to check is not the diameter but whether the tooling matches your table’s hole spacing and your workflow; brands like Strong Hand BuildPro and others make broad ranges of 5/8 inch tooling that drop into any 5/8 inch or 16 mm table. If you run a Lincoln table with 16 mm holes, its own F-clamp kit is a guaranteed fit, but you are not locked to one brand. When in doubt, confirm the tooling lists your hole size.
Which table tooling to buy
Here are three good pieces to start a fixture table.
- Strong Hand BuildPro inserta clamp (5/8 inch) drops into any 5/8 inch or 16 mm hole and clamps vertically or horizontally anywhere on the grid, the versatile core clamp for a fixture table. Its limitation is that you will want several to hold larger assemblies.
- Nexigins 12-piece welding table fixture pins (5/8 inch) is a set of carbon-steel locating pins for 5/8 inch (16 mm) holes, the first tooling many people add for square, repeatable positioning. The trade-off is that pins locate but do not clamp, so pair them with clamps.
- RCTUTEIAO 12-piece fixture pins with V-blocks (5/8 inch) combines locating pins with V-groove pieces for holding round tube and stock, adding versatility for tubular work. Its limitation is that it is a locating set, not a clamping one.
How to choose: for holding force anywhere on the grid, the inserta clamp (buy several). For basic locating, the Nexigins pin set. For round and tubular work, the RCTUTEIAO pins with V-blocks.
Who should skip a full tooling array: welders with a simple flat bench and no hole grid, who are better served by standard C-clamps and locking clamps.
The bottom line
A fixture table becomes powerful only when you fill its grid with the right tooling. Fixture pins are the quiet workhorse, locating parts squarely and repeatably, and they are the first thing to add after the table. Table clamps, especially inserta-style clamps, apply real holding force anywhere on the grid, so you can lock work down exactly where the joint is. Hole sizes of 5/8 inch and 16 mm are close enough that most tooling interchanges, though it is worth confirming your size. Start with a set of pins and a few clamps, then grow into stops, V-blocks, and specialty pieces as your work demands.
FAQ
What tooling do I need for a welding fixture table? Start with fixture pins for locating parts and a few table clamps (inserta-style) for holding them down anywhere on the grid. Add stops and rests for reference edges and V-blocks or cones for round stock as your work requires. Pins plus clamps cover most setups.
Are 5/8 inch and 16 mm welding table tooling interchangeable? Practically yes. 5/8 inch is about 15.9 mm and 16 mm is about 0.630 inch, a difference of only a few thousandths, so most tooling fits both. Many brands advertise 5/8 inch and 16 mm compatibility. Confirm the tooling lists your hole size, but you are not locked to one brand.
What are welding table fixture pins for? Fixture pins are hardened pins that drop into the table’s holes to locate and register parts in exact positions. Because the holes sit on a precise grid, pins let you set parts squarely and repeatably without measuring each time, making them the most useful first tooling to add.
How do inserta clamps work? An inserta clamp slots into a 5/8 inch or 16 mm hole anywhere on the table and applies clamping force vertically (pressing work down) or horizontally (against a pin or stop). Unlike a C-clamp limited to the table edge, it lets you clamp exactly where the joint needs pressure.
How many clamps do I need to start? A handful of clamps plus a set of pins covers most starter setups. You want enough clamps to hold the parts of a typical assembly at once, so several is better than one or two. Add more as your projects get larger or more complex.
Can I use any brand of tooling on my fixture table? Usually, as long as the tooling matches your hole diameter (5/8 inch or 16 mm) and your hole spacing works for the piece. Brands like Strong Hand BuildPro make broad 5/8 inch ranges that fit any 5/8 inch or 16 mm table, while a table maker’s own kit is a guaranteed fit for its table.
References
- Lincoln Electric welding table clamp set (K5442-1) specifications, including 16 mm fixture holes and F-clamp design (manufacturer), lincolnelectric.com.
- Strong Hand Tools BuildPro inserta clamp and 5/8 inch fixturing element specifications (manufacturer), stronghandtools.com.
- The Fabricator guidance on modular fixture tables and work holding (industry publication), thefabricator.com.