Groove Weld Symbol Guide
When a joint has to carry real load, or when full penetration matters, you stop making simple fillets and start preparing the joint edges for a groove weld. That preparation, the bevel, the V, the U, comes with its own family of symbols, and they pack more information than a fillet mark: the groove shape, the angle, the root opening, and how deep the weld goes. This guide walks through the groove weld symbol family so you can read a prepared joint correctly and understand what the drawing is asking for.
A groove weld symbol shows a weld made in a prepared joint, using a shape (square, V, bevel, U, or J) that indicates how the edges are cut, along with dimensions for groove angle, root opening, and weld size. Here is how to read each one.
The groove weld family
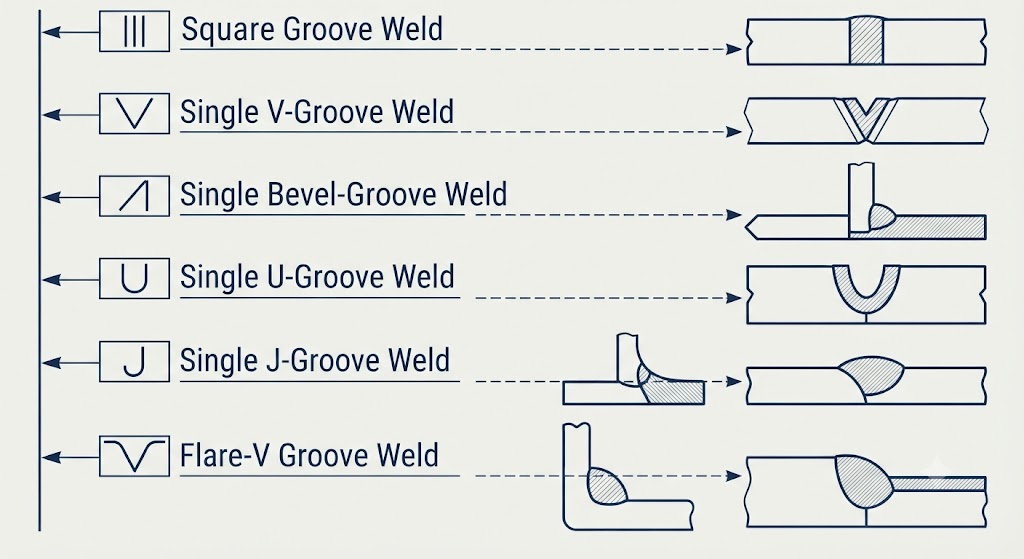
Groove welds come in several forms, each with its own symbol shape:
- Square groove: two parallel lines, for square-edged joints with little or no bevel.
- V-groove: a V shape, for both members beveled to form a V.
- Bevel groove: a bevel on one member only.
- U-groove: a U shape, for a curved (J on each side) preparation.
- J-groove: a J shape, a curved bevel on one member.
Each is placed on the reference line and read with the same below/above position rules as any weld symbol.
Direct answer: reading a groove symbol
To read a groove weld symbol, work through it in order:
- Identify the groove shape (square, V, bevel, U, or J) to know the edge preparation.
- Check position: below the reference line means arrow side, above means other side.
- Read the groove angle, the included angle of the preparation, shown near the symbol.
- Read the root opening, the gap at the root, shown inside the symbol.
- Read the size: the groove weld size (depth) to the left, effective throat in parentheses if less than full.
For bevel and J grooves, the arrow often has a break, pointing to the member that gets the preparation.
The groove shapes
Each shape tells you how the joint edges are cut. A square groove is drawn as two parallel vertical lines and is used where the edges are square with only a small gap, for thinner material. A V-groove is a V, formed by beveling both members, and is one of the most common for full-penetration welds. A bevel groove is like half a V, with only one member beveled and the other left square. A U-groove uses a curved preparation on both members, saving weld metal on thicker sections, while a J-groove is a curved bevel on just one member. Recognizing the shape is the first step, because it tells you both how the joint is prepared and what kind of weld metal volume to expect.
Groove angle and root opening
Groove welds carry two dimensions that fillets do not. The groove angle is the total included angle of the preparation, the angle the beveled faces make with each other, and it is shown near the groove symbol. The root opening is the gap left between the members at the bottom (root) of the joint before welding, and it is placed inside the groove symbol. These two figures matter because they control access to the root and how the weld fills the joint: too tight and you cannot reach the root for full penetration, too open and you have more to fill. When a drawing specifies both, it is telling the welder exactly how to fit up the joint before striking an arc, which is as important as the weld itself.
Weld size and penetration
Groove weld size describes how deep the weld goes. For a groove weld, the size (depth of preparation, or the groove weld size) is placed to the left of the symbol. When the weld does not fully penetrate the joint, an effective throat or effective weld size is given in parentheses, telling you the actual depth of fused metal expected. A key concept here is complete joint penetration versus partial joint penetration. A complete joint penetration (CJP) weld fuses through the full thickness of the joint, and for a single groove with no size given, complete penetration is generally implied. A partial joint penetration (PJP) weld intentionally fuses only part of the thickness, and its depth is stated. Reading the size and any parenthetical throat tells you which you are dealing with.
The break in the arrow
One detail specific to bevel and J grooves is worth calling out. When only one member is prepared (as in a bevel or J groove), the drawing needs to show which member gets the bevel. It does this by putting a break, a sharp kink, in the arrow, so the arrow points clearly at the member to be prepared. If you see a groove symbol with a bent arrow, that break is telling you which piece to cut. For symmetric preparations like the V and U grooves, where both members are prepared the same way, the arrow is drawn straight because there is no ambiguity about which side to bevel.
The bottom line
Groove weld symbols carry more information than fillets because the joint itself is prepared. Start by identifying the groove shape, square, V, bevel, U, or J, to know how the edges are cut, then apply the standard below/above position rule for the side. Read the groove angle and the root opening (shown inside the symbol) to understand the fit-up, and read the size to the left, with an effective throat in parentheses for partial penetration. Remember that a single groove with no size usually means complete joint penetration, and watch for a break in the arrow on bevel and J grooves, which points to the member that gets the preparation. With those rules, a prepared joint reads as clearly as a fillet.
FAQ
What is a groove weld symbol? It is the symbol for a weld made in a prepared joint, using a shape (square, V, bevel, U, or J) that shows how the edges are cut, along with dimensions for the groove angle, root opening, and weld size. It is placed on the reference line and read with the same below/above position rules as other weld symbols.
What are the types of groove welds? The main types are square groove (square edges, small gap), V-groove (both members beveled into a V), bevel groove (one member beveled), U-groove (curved preparation on both members), and J-groove (curved bevel on one member). Each has its own symbol shape indicating how the joint is prepared.
What does the root opening mean on a groove symbol? The root opening is the gap left between the members at the root of the joint before welding, and it is shown inside the groove symbol. Along with the groove angle, it controls access to the root and how the weld fills the joint, so it tells the welder how to fit up the joint.
How is groove weld size shown? The groove weld size (depth of preparation) is placed to the left of the symbol. When the weld does not fully penetrate the joint, an effective throat or weld size is given in parentheses to state the actual depth of fused metal. A single groove with no size given generally implies complete joint penetration.
What is CJP versus PJP? Complete joint penetration (CJP) fuses through the full thickness of the joint and is generally implied by a single groove with no size given. Partial joint penetration (PJP) intentionally fuses only part of the thickness, with its depth stated on the symbol. Reading the size and any parenthetical throat tells you which applies.
Why does the arrow have a break on some groove symbols? A break (kink) in the arrow appears on bevel and J grooves, where only one member is prepared, to point clearly at the member that gets the bevel. Symmetric grooves like V and U, where both members are prepared the same way, use a straight arrow because there is no ambiguity.
References
- AWS A2.4, Standard Symbols for Welding, Brazing, and Nondestructive Examination, groove weld provisions (industry standard), aws.org.
- Miller Electric and Lincoln Electric guides to groove weld symbols and joint preparation (manufacturers), millerwelds.com, lincolnelectric.com.
- The National Board references on complete and partial joint penetration welds (industry reference), nationalboard.org.